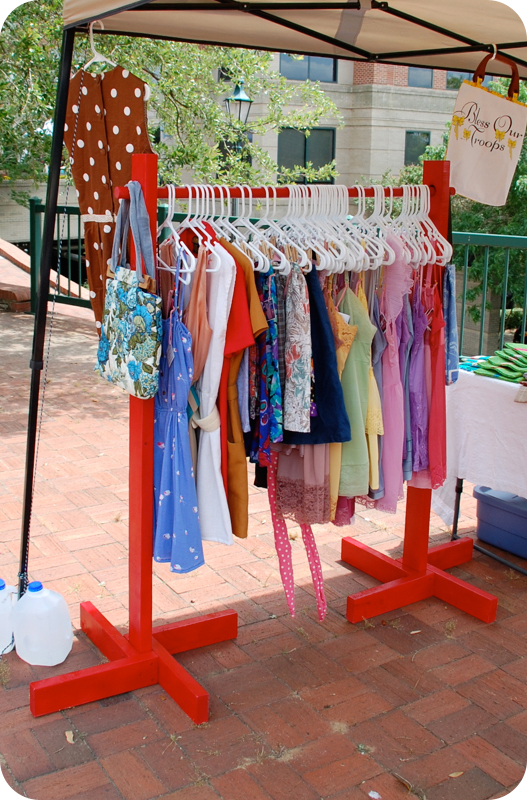
DIY clothing rack
For months, I've wanted to make a new clothing rack. The one I have in my sewing room is flimsy and fall over all the time! I bought it at Walmart for $10, and it's time for retirement. I drew up a design for something I could make at home, using 2x4s, some spray paint and some power tools. I wanted something that is easily taken apart for transport. I made it last Friday and used it at my show on Sunday. here is the tutorial so you can easily make one for yourself!
I plan on keeping mine in my sewing room between shows in place of the cheap Walmart rack. Standing 5' tall and about 4' wide, it breaks down into three pieces and easily fits into the backseat of my car.
- two 10' 2"x4"s. $5 each.
- sanding sponges, $2.
- 1 1/2" spade bit, $6.
- 1" dowel, 4' long, $4.
- spray paint, $4 per can, I bought two cans.
- wood screws, 3" long
- a power drill

Sand all the edges. See the video above.
Take the two 5' pieces, mark 4 inches down and the exact center of the board. Using the spade bit, you will drill the hole that the dowel will sit in.
If you are not expierienced with a power drill PLEASE get some assistance. This was even slightly difficult for me since I'd never used a spade bit. It will cut a hole in the wood the exact width of the bit. Match the point of the bit with the mark on your wood and drill. See video below.
Don't mind the audio. I was watching the BBC version of the Office. Great show.
Following the drawing above, attach all of the 15" pieces to the bottom of the 5' tall 2x4s. Make sure they are all square and flush with each other at the base of the rack or it will not sit well on the ground and it will rock like an uneven table.
Again, if you haven't done anything like this before, seek help from someone who has for some tips on using a drill. I used about three screws on each piece of wood, making sure it was drilled into the 5' pieces and the adjacent 15" pieces.
It will look like this when you are done.
And the dowel will sit perfectly in each of the holes.
Last step: spray painting. Make sure you paint in a well ventilated area and away from the house if it is windy. Using this much spray paint, you can easily get a cloud of paint that will cover a nearby wall. I used about a can and a half, and two coats. Allow to dry for a few hours and you are done!
If you don't like the look of spray paint, you can always stain it! There are even colored stains available now! Ask the guy at the paint counter at a local hardware store about your options. You can even paint fun designs on it if you'd like.
You now have the perfect clothing rack.
It holds a lot of clothes, and most importantly, it is wind resistant!
Questions? Comments!


You are so talented!
ReplyDeleteI must share this on Sew Much Talent. I'll link back to your tutorial!
This IS awesome!!! Btw, I have an entire workshop at my house if you ever need to use it. Tons of power tools and paints.
ReplyDeleteMy fiance and I are starting our own Thrift store and we were struggling to find nice diy clothing racks. This is just plain awesome!
ReplyDeleteWow! what an idea ! What a concept ! Beautiful .. Amazing Nice review! I may have to check that out.
ReplyDeleteHello, I love reading through your blog, I wanted to leave a little comment to support you and wish you a good continuation. Wish you best of luck for all your best efforts. garment racks, garment racks manufacturer.
ReplyDeleteI have looked everywhere trying to find a simple, sturdy rack. This is exactly what I wanted. Thank you.
ReplyDeleteYou can place these items anywhere you have some free space. They can be put in the bedroom, somewhere where they don’t incommode you. They can also be part of a dressing room, if you have one.
ReplyDeletePerfect!!! Exactly what I was looking for; attractive too. Can the dowel be longer to accommodate more clothing, or would that compromise the integrity of the rack? Thanks for a great DIY clothing rack.
ReplyDeleteBest design that I've seen online yet! I've wanted to construct some clothes racks for a garage sale without having to spend a fortune. Love this design, the ease of building it and it will be sturdy especially on a breezy day.
ReplyDeleteYou could make a third stand and use a 8' dowel and run through all three holes to make it longer.
ReplyDeleteI just made this - it only took me 30 minutes ( without painting). It looks great and does the job! Thanks so much for this design.
ReplyDeleteDo you have an approximate of how much weight you think this rack could hold??
ReplyDeleteApprox how much did you spend? And how much weight do you think it would hold?
ReplyDeleteLove your idea for the clothing rack. I have been trying to come up with a plan to make a couple. Thanks
ReplyDelete