Sewing Tutorial: How To Take In A Guayabera
The trick to alterations, and altering clothing to fit to size, is to make it look like you never touched it. Like it was never altered in the first place. Friends of mine are getting married next month, and the groom is wearing his grandfather's Guayabera, a men's traditional Cuban shirt. This was something I had never done before, but not out of my skill set. These shirts are unlike other men's fitted shirts in that they have a front pocket, and a slit at the side seams.
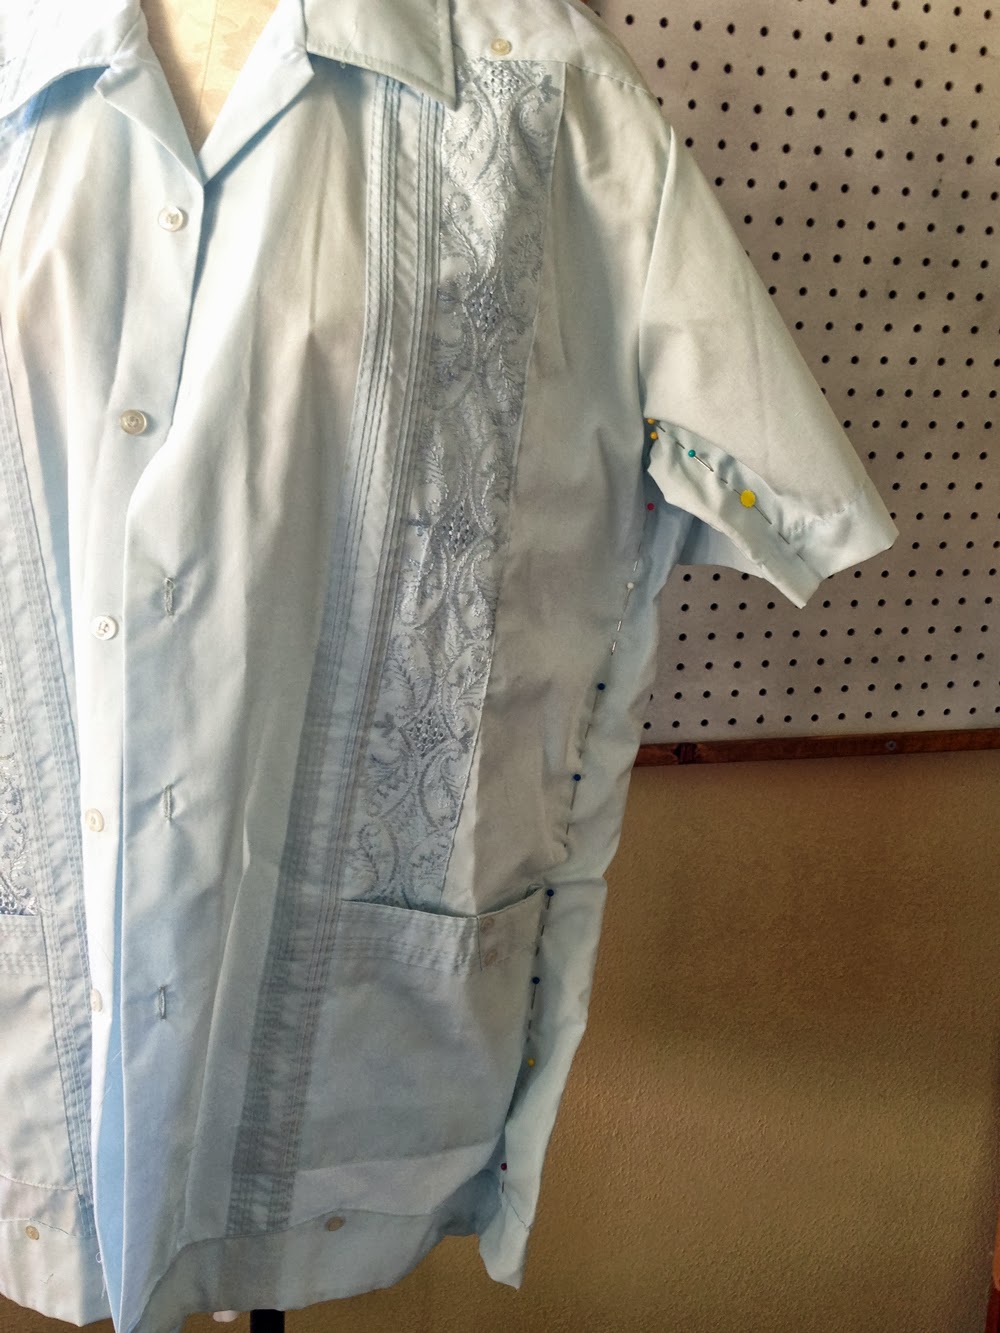
First, pin to fit. Because it's a loose fitting shirt for warm climate, it is meant to be a bit loose, and there are no darts in the shirt at all. To take it in, pin. This shirt needed to be taken in about 3" on each side, from the sleeve, all the way down to the bottom hem. I like to notate how much each side is being taken in, on a separate piece of paper.
With a seam ripper, carefully remove the side buttons. Also remove button and set aside.
Remove pins and turn shirt inside out, side seam at right side. Fold perfectly flat, and repin. I used a disappearing fabric pin to mark my outlined sewing path for you to see. The pin holes will show in the slightest bit. Starting at the sleeve, sew all the way down to a few inches from the bottom. Keep this stitch as smooth and straight as possible, especially in the underarm. Keep your ruler nearby to check your measurements.
Now look at the right side. See where the stitch stops from the original sewing. Mark this level with a pin, and sew the side seam up to this point. Backstitch to keep in place.
Trim excess fabric from along the seam you just sewed, leaving 1/4". Don't cut below. See next picture before you cut!
Now before you cut, take a look at the factory sewing. You can't simply cut with 1/4" edge, because you will have to recreate the slit on the side. The back panel is a little wider, so it can be folded and sewn, to have a finished edge. Cut the front panel with 1/4" edge.
Starting at sleeve, zig zag stitch raw edges together.
Press. Use a ham to press sleeve and underarms.
Who even knows what this little piece of fabric is called? I sure don't. I don't do a lot of men's alterations, either. So if anyone knows what this is called, please comment below. So taking this little guy, line it up with the bottom hem, and pin the point exactly at the side seam.
Carefully tucking and playing with the front panel, tuck it back into the button flap. Pin to the back fabric (pink pin) to keep them flat. When it is pinned, it should lay flat as if the front and back were sewn together, without this panel. Using water soluable ink, I traced the stitch path.
Start at the bottom of the shirt, and sew up to the point, apex of the panel.
At the end of this last turn, backstitch.
Reattach button. To be sure that it will line up perfectly, lay pieces together, and be sure when it lays flat, your needle comes through the buttonhole. If it doesn't line up, remove button and start over. This is a very important detail.
So now that your side seams have been taken in, your pockets are too close to the side seams. Carefully, I repeat, CAREFULLY, remove them with a seam ripper. DO NOT use a razor blade.
Depending on the Guayabera, the vertical lines of the shirt will enclose the centermost part of the pocket, or the entire pocket is top stitched onto the front panels. With this shirt, remove the outermost stitch to free the pocket.
Use a ruler, and move the pocket over about an inch. Be sure to check both sides for symmetry. You may need to trim a little off the raw edge of the pocket.
Again, with a sewing pen, you can see the stitch path. Starting where the BLUE pin is located, sew the pocket. You may need to sew before and past this side of the pocket, be sure to close up this piping.
Backstitch when you get to the end of the pocket. Press shirt, this will close up holes from previous stitches of the pocket. And THAT'S IT. I always spend a few minutes checking for loose thread, since I'm sewing for someone else, and run a lint roller over the shirt as well.
Ignore that this is on a women's bodice. Questions? Comments! I'd love to hear from you!


That looks so great! The detail on the shirt is tricky. Nice job! I need to get a Ham. :)
ReplyDeleteMy ham is so useful, I LOVE it!
DeleteHi Sally,
ReplyDeleteMy boyfriend and I are also getting married. My sister got him a pair of guayaberas for the wedding that are a bit too big for him. I'm planning on re-sizing the way you are doing, but I think it may end up a little too long.
I'll try and let you know. :)
I hope you found this tutorial helpful! :)
DeleteThis is very interesting!! I will share this information to my mom because she loves making her own dress and she also changes the fitting of some of our clothes. My dad also loves Guayabera clothing because it looks descent and very breathable to his skin. -www.theguayaberashirtstore.com
ReplyDeleteYeiii!! I succeeded!! Nice guayabera for my boyfriend!
ReplyDeleteThanks for the help provided by the tutorial! :)
Happy to help! :)
Delete